Friday, 30 March 2012

Depois de algum tempo e algumas mudanças.....

    Depois de quase 6 meses sem postar nada no Blog.... Pedindo desculpas em primeiro lugar..... mas foi por um bom motivo....
    Queria compartilhar com vocês que me tornei Pastry Chef no restaurante onde trabalho aqui na Irlanda ou seja a Chef responsável por todas as sobremesas. Uma conquista muito grande pra mim.... e de uma felicidade sem tamanho....
     Hoje depois de alguns meses na cozinha, posso dizer com muita categoria.. NÃO É NADA FÁCIL!!!! A carga horária é muito alta.... e o dinheiro...pra quem está começando como eu.... não é lá muito alto........ MAAASSS.... a experiência que estou adquirindo é sem tamanho......
     A boa notícia é que pretendo compartilhar com vocês toda a  experiência, técnicas e receitas que tenho adquirido....
     É isso....

    Até breve...
    Pri Zonaro

************************************************
    After nearly six months without posting anything on the blog .... Apologizing in the first place ..... but it was for good reason ....
     I wanted to share with you that I became Pastry Chef at the restaurant where I work here in Ireland or the chef responsible for all dessertsA great achievement for me .... and total happiness ....
      Today after a few months in the kitchen, I can say with great category .. IS NOT EASY!! The workload is too high .... and money ... for the beginner like me .... is not that good........ BUT .... the experience I'm getting is amazing ......
      The good news is that I want to share with you the whole experience,techniques and recipes that I have acquired ....
      That's it ....

     See you soon ...
     Pri Zonaro

Monday, 17 October 2011

Pêra Cozida com Calda de Chocolate e Sorvete ! ( Poached Pear, Chocolate Sauce & Ice Cream)

Uma Sobremesa super elegante.....servidas nos mais tradicionais restaurante e suuuper fácil de ser feita.. com um efeito visual fantástico!!!

Vamos a receita!?
Dificuldade da receita: ✰✰


Para o cozimento das pêras:
# 4 pêras
# 1 litro de água
# 400g de açúcar
# 8-10 cravos da India
# 1 colher de canela em pó ou 3 pedaços de canela em pau


Em uma panela, coloque a água, a canela o cravo e o açúcar. Deixe ferver até que a mistura fique homogênea. Descasque as pêras e quando a nossa solução estiver homogênea, coloque-as delicadamente na panela e as deixaremos cozinhar por 12 minutos.
Desligue o fogo e as deixe dentro da solução até que você finalize os outros ingredientes para o prato ser servido.


Usaremos ainda:
# 100g de Amêndoas fatiadas
# 200g de Chocolate ao leite
# Sorvete de Bailey's ou Vanilla


Em banho maria derreta o chocolate e em uma frigideira toste as amêndoas para que as mesmas tenham seu sabor realçado.


Em um prato, posicione um pêra cozida (corte a base para que a mesma fique em pé no prato), com uma colher, coloque o chocolate derretido no topo da pêra até que escorra e cubra quase toda a pêra. Coloque as Amêndoas delicadamente por cima do chocolate e por último coloque uma bola de sorvete ao lado.


Nossa sobremesa está pronta!!!
Fácil né?!?!


Chefs de Plantão.... Mãos a Obra e Já para a cozinha!!!!!
Até breve!!


Xxxxxx


****************************************************************************************
A super elegant ..... Dessert served in the most traditional restaurant andsuuuper easy to do .. with an amazing visual effect!

Let go to the recipe?
Difficulty of the recipe: ✰ ✰

For cook the Pears:
# 4 pears
# 1 liter of water
# 400g sugar
# 8-10 cloves of India
# 1 teaspoon ground cinnamon or 3 pieces of cinnamon stick

In a saucepan, place water, cinnamon, cloves and sugar. Simmer until mixture is smooth. Peel the pears and when our solution is homogeneous, place them gently in the pan and let cook for 12 minutes.
Remove from heat and let them into the solution until you finish the other ingredients to the dish being served.

We still will use:
# 100g sliced ​​almonds
# 200g Milk Chocolate
# Bailey's or vanilla ice cream

In double boiler melt the chocolate and in a pan and toast the almonds so that they have enhanced their flavor.

In a bowl, place a pear cooked (cut off the base so that the same stand on the plate), with a spoon, place the melted chocolate on top of the pear until run-offand cover most of the pear. Place the almonds over the chocolate gently and finally put a scoop of ice cream on the side.

Our dessert is ready!
Easy huh??!

Chefs of Duty .... Get Busy and now to the kitchen !!!!!
See you soon!

xxxxxx


Wednesday, 7 September 2011

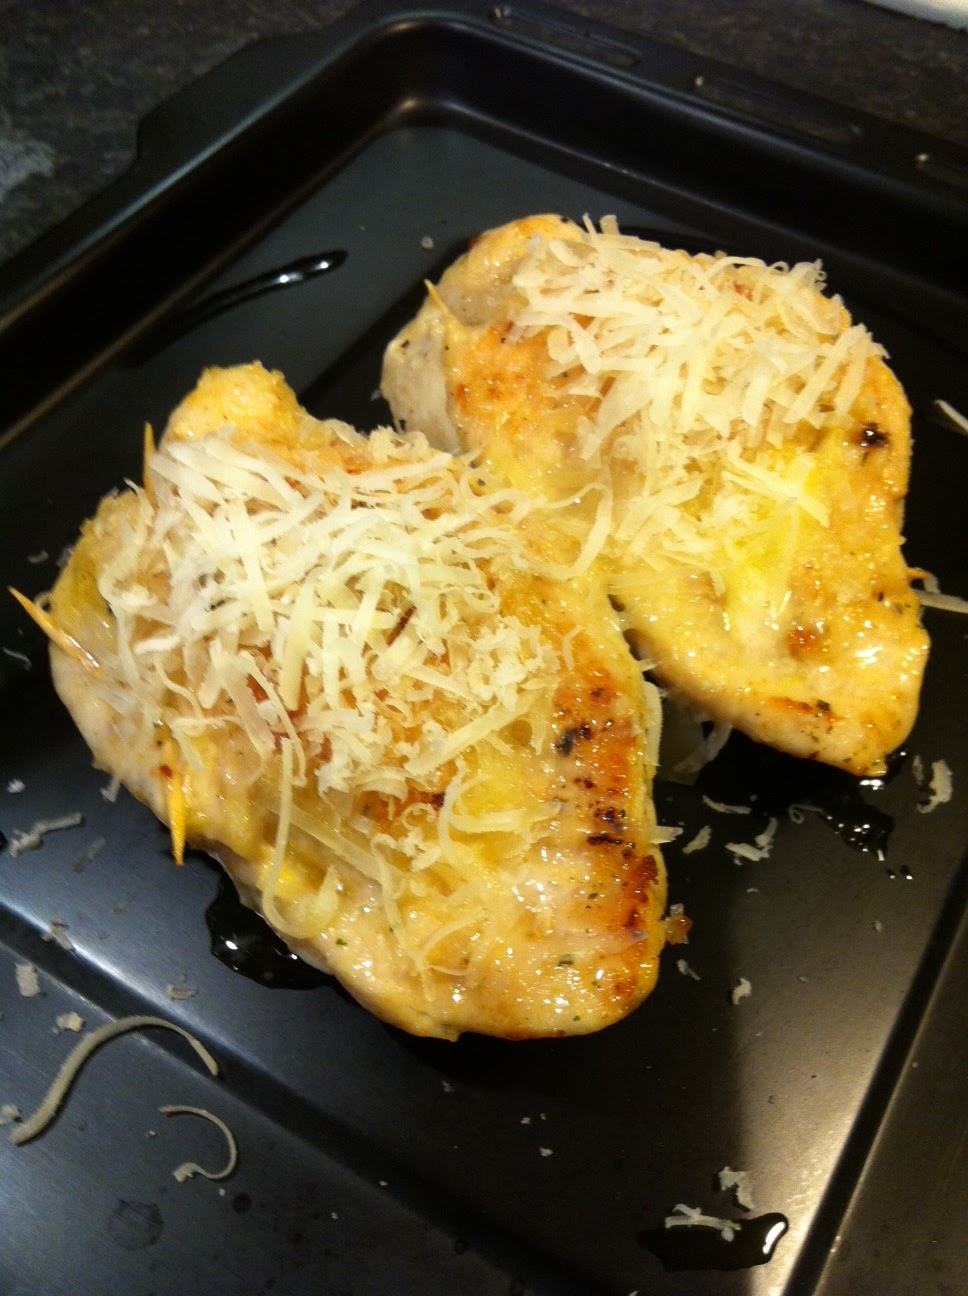
Filé de Frango Recheado!!!! (Stuffed Chicken Fillet !!!)

Sabe aquela comidinha que a gente faz bem gostosinha .... para um almoço ou jantar rapidinho..... Uma saladinha...com um filé de frango.... ???!!! Que tal deixar o filé de frango um pouquinho mais interessante???
Vamos a receita ?!
Dificuldade da receita: ✰✰

# 2 Meios peitos de frango
# 1 cubo de caldo de galinha
# 1 fatia de presunto
# 1 fatia de queijo
# Queijo parmesão ralado grosso
# Manteiga/Azeite para fritar
# Palitos de dente


Rechearemos o filé de frango com o presunto e queijo, fecharemos com os palitos de dente, fritaremos o frango e os finalizaremos ao forno cobertos como  queijo parmesão.


Para temperarmos os filés de frango, desmancharemos o cubo de caldo de galinha em um pouquinho de azeite, até que o mesmo vire uma pasta. Besunte os dois filés com a pasta de caldo de galinha.


Faremos uma incisão no meio do filé de frango, deixando as laterais fechadas.
 Preencheremos o espaço aberto com presunto e o queijo e fecharemos filé de frango com dois palitos de dente, em zigue e zague para que o recheio não saia enquanto o fritamos.


Derreteremos um pouquinho de manteiga em uma frigideira anti aderente e assim que derretida, adicionaremos um fio de azeite.
Coloque os filés de frango delicadamente e vá virando até que os mesmos estejam cozidos.
Pré aqueça o forno enquanto frita os filés....   Quando prontos, coloque os mesmos em uma assadeira e coloque o parmesão ralado grosso por cima.
Os filés estarão prontos quando o queijo parmesão estiver dourado.


Fácil né!?


Chefs de plantão... mãos a obra e já para a cozinha!!!
Até breve!
Xxxxxx


***************************************************************
You know that we do that food pretty yummy .... for lunch or dinner in no time ..... A salad with a chicken .... ???!!! How about letting the chicken steak a little more interesting??

Let's goto the recipe?!
Recipe Difficulty: ✰ ✰


# 2 chicken breasts
# 1 cube of chicken stock
# 1 slice of ham
# 1 slice of cheese
# Coarse grated Parmesan cheese
# Butter / Olive Oil for frying
# Toothpicks

To season the chicken steak, melts the cube of chicken stock in a little Olive oil. Smear the two steaks with the paste of chicken stock.

We will make an incision in the middle of the chicken fillet, leaving the sides closed.
  Fill in open space with ham and cheese and chicken fillet will close with two toothpicks, zig and zag so that the filling does not leave while the fry.

Melt a little butter in a frying pan anti adherent and so melted, add adrizzle of olive oil.
Place the chicken fillets and head turning gently until they are cooked.
Preheat the oven while frying the steaks .... When ready, place them on a baking sheet and place the grated Parmesan on top thick.
The fillets are ready when the Parmesan cheese is golden brown.

Easy huh!?

Chefs on duty ... get busy and now the kitchen!


See you soon!
xxxxxx

Tuesday, 23 August 2011

Torta Mousse de Maracujá !!! (Passion Fruit Tart-Mousse !!!)

Essa receita também entra para as famosas,  tradicionais e deliciosas gostosuras brasileiras......
Torta de mousse de maracujá......
Vamos a receita?!
Dificuldade da receita: 


Para a massa:
# 2 pacotes de biscoito de chocolate
# 8 colheres de manteiga aproximadamente


Para o recheio:
# 1 envelope de gelatina sem sabor
# 4 colheres de sopa de água
# 1 lata de leite condensado
# 1 lata de creme de leite
# 1 lata de polpa de maracujá sem sementes


Para a cobertura
# Polpa de 2 maracujás com sementes
# 3/4 de xícara de açúcar


Para a massa: 

Triture os biscoitos aos poucos no liquidificador. Misture o biscoito triturado com a manteiga até obter uma farofa. Forre com ela o fundo e os lados de uma fôrma redonda de aro removível de 24 cm de diâmetro, apertando bem com os dedos. Reserve.
Para o recheio:
Hidrate a gelatina com a água e dissolva em banho-maria. Bata no liquidificador a gelatina dissolvida com os demais ingredientes do recheio. Recheie a torta. Leve à geladeira até firmar (cerca de 3 horas). 


Para a cobertura:
Coloque a polpa e o açúcar em uma panela e leve ao fogo baixo ate que o açúcar e encorpore a polpa e se transforme em uma calda. Isso leva aproximadamente 5 minutos. Reserve e deixe esfriar.


Desenforme a torta e coloque a calda por cima!!!


Gostaram.... ??!!


Chefs de plantão ... mãos a obra e já para a cozinha!!!!


Ate breve!!
XXxxxxxx


******************************************************************
This recipe also goes for the famous and delicious traditional Brazilian delights ...... Passion fruit mousse tart ......

Let the recipe?! Recipe Difficulty: ✰ ✰


For the dough:                                                                   
# 2 packages of chocolate chip cookie                              
# 8 tablespoons butter approximately


For the filling:                                                                      
# 1 envelope unflavored gelatin                                        
# 4 tablespoons water                                                      
# 1 can condensed milk
# 1 can heavy cream
# 1 can passion fruit pulp, seeded


To cover
# 2 passion fruit pulp with seeds
# 3 / 4 cup sugar

For the dough: Grind cookies in blender slowly. Mix crushed cookies with butter until a crumbly. Stuff it in the bottom and sides of a round pan removable rim 24 cm in diameter, pressed firmly with your fingers. Reserve.


For the filling: Hydrate the gelatin with water and dissolve in a water bath. Whisk the dissolved gelatin into the blender with other ingredients in a fruitcake. Fill the pie. Refrigerate until firm (about 3 hours).


For the topping: Put the pulp and sugar in a saucepan and bring to low heat until sugar and embodies the pulp and turns into a syrup. This takes about 5 minutes. reserve and let cool.


Turn out the tart and put the syrup on top!


Liked it .... ?!


Chefs on duty ... get busy and now to the kitchen!!

See you soon!
 Xxxxxxxx 

Friday, 12 August 2011

Irish Style: Irish Coffee !!!

Que tal uma mudança na sua receita de café e tentar a receita de um café irlandês clássico? Essa receita de café irlandês é rápida, divertida, elegante e sofisticada. É ótima para quando você tem alguns convidados ou quando você está com vontade de fazer algoespecial para si mesmo. 
O café irlandês foi criado em Foynes, no distrito de Limerick  e lá você pode saborear uma das bebidas mais famosas da IrlandaEla foi criada quando um grupo de americanos chegaram em um vôo, estavam com muito frio, molhados e com fome tarde da noite.

O Chef Joe Sheridan decidiu colocar um pouco de uísque em seus cafés e assim nasceu uma das poucas bebidas, cujas origens são definidos no tempo e no espaço para sempre. Posteriormente, um dos passageiros perguntou se eles estavam sendo servidos com café brasileiro, mas Sheridan respondeu: "Não, é café irlandês!" Eis que nasce uma das mais tradicionais bebidas da Irlanda.


Vamos a Recita?!
Dificuldade da Receita: 
# 1 xícara de café preto, forte e bem quente
# 1 colher e meia de chá de açúcar
# 1 dose e meia de uísque
# 2 colheres de sopa de creme de leite fresco batido em ponto de chantilly
# 2 colheres de creme de leite fresco


Coloque em uma taça o café, o açúcar e o uísque e mexa até dissolver todo o açúcar. A mistura deve ficar um dedo abaixo do topo da taça.
    Em um recipiente, bata o creme de leite fresco até o ponto de chantilly. Coloque em uma pequena jarrinha duas colheres de creme batido e duas colheres de creme fresco e misture bem.A mistura ficará bem cremosa.
    Para colocarmos o creme no topo do café e o mesmo não se misturar, derrubaremos o creme cuidadosamente nas costas de uma colherinha, para que o mesmo caia suavemente sobre a superfície, até completar a taça! Certifique-se de que a colher não está encostando na superfície do café!
    Mesmo que você não costume usar açúcar no café, neste caso é necessário, pois o açúcar é fator importante em manter o creme na superfície, não deixando que o mesmo se misture com o café!
    E para quem não é muito fã de uísque, o mesmo pode ser feito também com Beileys, que também é fabricado aqui na Irlanda!!!
    Espero que gostem!!!

Chefs de plantão.... mãos a obra e já para a cozinha!!!!

Até breve!!!
XXXXXxxxx


**************************************************

Get a change to your casual coffee recipe; try the classic Irish coffee recipe. This Irish coffee recipe is quick and fun and it is elegant and sophisticated. It’s great for when you have a lot of people over or when you are in the mood to make something special for yourself.


The Irish Coffee was created in Foynes and here you can sample one of Irelands most famous drinks. It was created when a group of Americans arrived off a flight, that were cold, wet and hungry late at night.


Chef Joe Sheridan put some whiskey in their coffees and thus was born one of the few drinks, whose origins are defined in time and place forever. Afterwards, the passengers asked if they were being served Brazilian coffee, but Sheridan replied "No it's Irish coffee !".


Let's go to the recipe?!?!
Recipe Difficulty: ✰

  • # 1 cupful of strong, hot, black coffee
  • # 1 tsp sugar
  • # 1 measure whisky
  • # 1 small carton double cream


    Take a wine glass and pour enough of the coffee to fill it just over half way. Add the sugar and stir until it dissolves. Add the whisky and stir. Slowly pour a thick layer of double cream, over the back of a teaspoon, on to the top of the coffee so that it floats on top.


    Don’t forget to use the sugar even if you don’t usually add sugar to your coffee. In this case it is necessary as it provides the buoyancy for the cream to float atop the Irish coffee, this is the signature of the Irish coffee. Either white sugar or brown sugar may be used depending upon your personal preference.
    And who is not a big fan of whiskey, it can also be done with Beileys, which is also manufactured here in Ireland!
     Hope you enjoy!

Chefs on duty .... get busy and now to the kitchen!!

See you soon!
XXXXXXXXX

Thursday, 4 August 2011

Torta de Limão !!!! (Lemon Tart !!!)

    Hoje eu troquei alguns e-mail com o meu irmãozinho Brenno, que por sinal faz 18 aninhos esse ano... rsrsrs e me bateu uma saudade dele sabe...... por isso resolvi fazer um post dedicado a ele....  Com uma receita que ele adora e é uma das únicas coisas que ele pedia para eu fazer quando morava no Brasil!!!!
    Com vocês... a famosa ... TORTA DE LIMÃO !!!!!


Vamos a receita?!?
Dificuldade da receita: 


Para a Massa: 
# 1 pacote de biscoito maizena
# 100g de manteiga sem sal
# 1 colher de sopa de açúcar
# 1 colher de café de canela 

    Triture as bolachas em um liquidificador ou processador até virar uma farinha. Coloque
em um recipiente e adicione o açúcar, a canela e a manteiga, que deve estar em temperatura ambiente. Os ingredientes devem ser misturados delicadamente até que formem uma farofinha molhada. Coloque mais manteiga se necessário.     Depois de pronto, coloque o conteúdo em uma forma de fundo removível e forre o fundo e as laterais colocando leve pressão, para que a massa fique no lugar. Se a massa estiver esfarelando, é porque ainda está faltando manteiga.


Para o recheio:
# 1 lata de leite condensado
# 1 lata de creme de leite
# Suco de 2 limões
# raspas de um limão


    Bata no liquidificador o leite condensado, o creme de leite e o suco dos limões, formando o creme. Dica: bata por bastante tempo (5/7 minutos), para que fique bem cremoso.
    Coloque sobre a massa e reserve.
Para a cobertura:
# 1 xícara de açúcar
# 1/2  xícara de água
# 3 claras

Coloque o açúcar e a água numa panelinha e ferva até formar uma calda em ponto de fio forte. Bata as claras em neve firme. Despeje a calda de açúcar aos poucos, em fio, continuando a bater até esfriar e encorpar. O processo tem que ser lento e com muita paciência. Espalhe o marshmallow sobre a torta, termine com raspas de limão para decorar. Sirva gelado.

Dica: Para quem não for muito fã de Marshmallow, a dica é fazer mini tortinhas apenas com o creme e colocar raspas de limão para decorar!

Chefs de plantão.... mãos a obra e já para a cozinha!!!

Até Breve!!
Xxxxx
***********************************************************
Today I exchanged some e-mail with my little brother Brenno, by the way,  he is 18 years next October ... hehehe and I know kind miss him...... so I decided to do a post dedicated to him .... With a recipe that he loves and is one of the only things he asked me to do while living in Brazil!!
    
With you ... the famous ... LEMON PIE !!!!!
Let go to the recipe?!?Recipe Difficulty: ✰ ✰
For the dough:# 1 packet of digestive biscuits # 100g unsalted butter# 1 tablespoon sugar# 1 teaspoon cinnamon

    
Crush the biscuits in a blender or food processor. Place in a container and add the sugar, cinnamon and butter, which should be at room temperature. The ingredients should be mixed gently. Add more butter if necessary.
    
When ready, pour the contents into a form of removable bottom and line the bottom and sides by placing light pressure to the mass is in place. If the dough is crumbling, is because butter is still missing.
For the filling:# 1 can sweetened condensed milk# 1 can of heavy cream# Juice of 2 lemons# Zest of one lemon

    
Blend together the condensed milk, cream and juice of lemons, forming the cream. Tip: hit for a long time (5 / 7 minutes), so that it is creamy.
  

For the topping:# 1 cup sugar# 1 / 2 cup water# 3 clear
Place sugar and water in a saucepan and boil syrup until it forms a point of strong string. Beat the egg whites until stiff. Pour the sugar syrup slowly into yarn, continuing to beat until cool and thicken. The process has to be slow and with much patience. Spread the marshmallow on the cake, complete with lemon zest for garnish. Serve cold.
Tip: For anyone who is not a big fan of Marshmallow, the tip is just make mini tartlets with cream and put the lemon zest to decorate!


Chefs on duty .... get busy and now to the kitchen!
See you soon!Xxxxx

Sunday, 31 July 2011

Um...Dois... Feijão com Arroz !!! (Rice & Beans - Perfect Combination !!!)

    Alguém já parou pra pensar como surgiu esta combinação maravilhosa da culinária brasileira ?!?!
    Bom.... o que se sabe é que o arroz foi trazido pelos portugueses... e o feijão já era consumido pelos índios que no Brasil viviam.... Como os dois foram parar no mesmo prato?!?!
    Bom... essa resposta é ainda desconhecida... mas juntos, eles formam uma proteína que faz toda a diferença para a sua saúde. A dupla também ajuda a equilibrar os níveis de glicose no sangue e é aliada da saúde bucal.
    Como em um casamento feliz, a química aqui é perfeita. Mais do que uma saborosa parceria, o encontro do arroz com o feijão assegura um invejável arranjo de nutrientes. O que falta em um, o outro fornece e, assim, se completam. Unidos, oferecem uma excelente combinação protéica
    Tal performance é rara de ver entre os vegetais. Geralmente são alimentos de origem animal, como as carnes, que apresentam esse perfil protéico.
    A dica é botar no prato uma concha de feijão para meia escumadeira de arroz. Essa é a proporção precisa, do ponto de vista químico. Enquanto o arroz sozinho, principalmente o polido, pode disparar as taxas de açúcar e insulina na circulação, o feijão tem o poder de brecar esse efeito, o que mantém a glicose estabilizada. A mistura é, portanto, bem-vinda para manter a glicemia em níveis adequados e diminuir o risco do diabete.
    Qual o segredo para um arroz e feijão delícia!?!?
    Para o Arroz:
    Para 1 xícara de arroz, coloque na panela em fogo médio, 1 dente de alho espremido, um pedacinho de cebola bem picado, uma colher de café rasa de sal e uma colher de sopa de azeite.  Refogue e em seguida coloque o arroz, previamente lavado.
    Coloque água quente até a mesma ficar DOIS dedos acima do arroz na panela. Cozinhe em fogo baixo. Estará pronto quando toda a água secar!

    Para o Feijão:
    Deixe de molho em água quente 500g de feijão por aproximadamente 1 hora. Os grãos de feijão irão inchar, isso diminuirá o tempo de cozimento. Coloque-os em uma  panela de pressão, adicione um cubo e caldo de galinha e se quiserem e gostarem, podem colocar pedacinhos de bacon e/ou pedacinhos de linguiça calabresa para cozinhar junto com o feijão. Coloque água na panela até ficar 3 dedos acima do feijão. 
    Coloque para cozinhar e o mesmo deverá ficar 25 minutos na pressão.
    Após cozido, frite em uma panela a parte, 2 dentes de alho espremidos, 1 cebola média bem picada em um pouco de azeite. 
     Adicione o alho e a cebola ao feijão cozido e deixe ferver por mais alguns minutos. Adicione uma colher de salsinha fresca e picada ao feijão cozido.

    Espero que gostem!!! 

    Chefs de plantão... mãos a obra e já para a cozinha!!!!

    Até Breve!!!
    XXxxxxx
********************************************************************************
    Has anyone stopped to think how did this wonderful combination of Brazilian cuisine?!?!
    
Well ... What is known is that the rice was brought by the Portuguese ... and beans was already consumed by the Indians who lived in Brazil .... How they came to the same plate?!?!

    
Well .. this response is still unknown ... but together they form a protein that makes all the difference to your health. The pair also helps to balance blood glucose levels and is an ally of oral health.
    
Like a happy marriage, the chemistry is perfect here. More tasty than a partnership, the meeting of rice with beans ensures an enviable array of nutrients. What is lacking in one, the other provides, and thus complement each other. Together they offer an excellent combination of protein
    
This performance is rare to see among the vegetables. Are usually foods of animal origin such as meats, which provide the protein profile.
    
The trick is to put in a dish of beans to shell half slotted spoon rice.This is the precise proportion of the chemical point of view. While the rice alone, especially polished, rates can shoot sugar and insulin in the circulation, the bean has the power to brake this effect, which keeps the glucose stabilized. The mixture is therefore welcome to maintain adequate blood glucose levels and decrease the risk of diabetes.

    
What is the secret to a delicious rice and beans!?!?
    
For Rice:
    
For 1 cup of rice, place in saucepan over medium heat, 1 garlic clove, squeezed, a bit of finely chopped onion, a teaspoon of salt and a shallow tablespoon of olive oil. Saute and then place the rice, previously washed.
    
Place hot water until it gets two fingers above the rice pot. Cook over low heat. Will be ready when all the water dry out!
    
For the beans:
    
Soak in hot water 500g of beans for about 1 hour. The beans will swell, this will decrease the cooking time. Place them in a pressure cooker, add a chicken bouillon cube and if you want and like, you can put bits of bacon and/or bits of sausage to cook with the beans. Place water in saucepan until 3 fingers above the beans.
    
Put to cook and it should be 25 minutes in pressure.
    
Once cooked, fry in a pan part, 2 cloves crushed garlic, 1 finely chopped medium onion in a little olive oil.
     
Add the garlic and onion to the cooked beans and simmer for a few more minutes. Add a tablespoon of chopped fresh parsley and the cooked beans.

    
Hope you enjoy!

    
Chefs on duty ... get busy and already to the kitchen!!

    
See you soon!
    
XXXXXXX